
Do you need to learn how to optimize the usage of RAM on your computer? Perhaps you’ve been receiving low memory messages on your Windows PC. No need to worry! We have plenty of tips to help you reduce RAM usage on Windows.
Let’s explore some practical steps to clear RAM and ensure smooth operation of your computer. These methods are applicable to both Windows 10 and Windows 11.
What Is RAM and Its Purpose?
Before we delve into tips on how to clear RAM on Windows, let’s provide a brief explanation of RAM for those who may not be familiar with it. For a more detailed explanation, you can refer to our comprehensive RAM guide.
RAM stands for Random Access Memory, and it serves as a temporary storage medium that holds the currently running programs and processes on your computer.
The more RAM your machine has, the more programs you can run simultaneously without negatively impacting performance. When your computer runs low on RAM, it utilizes a portion of the storage drive known as the page file, which acts as a substitute for RAM. However, this is significantly slower than actual RAM, resulting in noticeable slowdowns when Windows resorts to using it.
Since RAM is volatile, its contents are lost when your computer shuts down. Any data you wish to retain must be saved to permanent storage, such as a hard drive or solid-state drive. This explains why, for example, an unsaved Word document will be lost if your computer shuts down unexpectedly.
How to Free Up RAM on Your Windows PC: 8 Methods
Let’s explore various ways to reduce your RAM usage. Although you won’t need to do this frequently, these methods prove useful when you encounter memory-related issues.
1. Restart Your PC
Restarting your computer is a commonly known troubleshooting tip, and it’s popular for a good reason.
Restarting your PC clears the contents of RAM and restarts all running processes. While this won’t increase your maximum available RAM, it eliminates unnecessary background processes that might be consuming memory. It’s possible that some processes are running without your knowledge.
Regularly restarting your computer prevents it from becoming sluggish, particularly if you use it extensively. If you haven’t restarted in a week and notice a drop in performance, it’s time for a reboot.
2. Check RAM Usage With Windows Tools
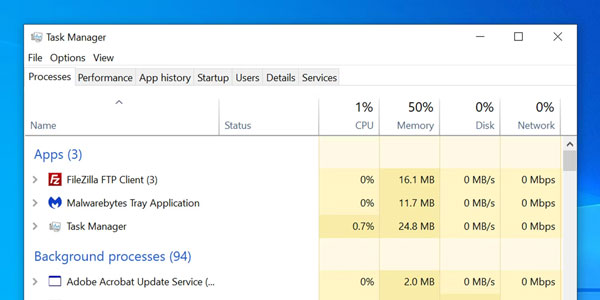
You don’t have to speculate about which applications are using your RAM. Windows provides tools to help you monitor RAM usage. To get started, open the Task Manager by searching for it in the Start menu or using the Ctrl + Shift + Esc shortcut.
Click on “More details” to view the expanded interface, if necessary. Then, navigate to the “Processes” tab and click on the “Memory” header to sort the processes based on their RAM usage, from highest to lowest. Take note of the applications listed here, as we’ll discuss them further later on. Keep in mind that resource-intensive applications require more RAM, so high RAM usage isn’t necessarily indicative of a problem. For instance, a web browser with multiple tabs open will consume more RAM than a simple notepad application.
For more detailed information, switch to the “Performance” tab. In the “Memory” section, you’ll find a chart depicting your RAM usage over time. Clicking on “Open Resource Monitor” at the bottom provides further details on the “Memory” tab of this utility.
The chart at the bottom displays the amount of free RAM you have. Sort by “Commit (KB)” in the top list to identify which programs are utilizing the most RAM. If you suspect a severe issue based on what you observe here, consult the comprehensive guide on troubleshooting memory leaks.

3. Uninstall or Disable Unnecessary Software
After identifying the applications that consume the most RAM on your system, consider whether you actually use them. A simple way to reduce RAM usage is by preventing unnecessary programs from consuming it.
Apps that remain open in the background but haven’t been used for months only waste valuable resources on your computer. Therefore, you should remove them. Navigate to “Settings > Apps > Apps & features” and click “Uninstall” for any app you wish to remove.
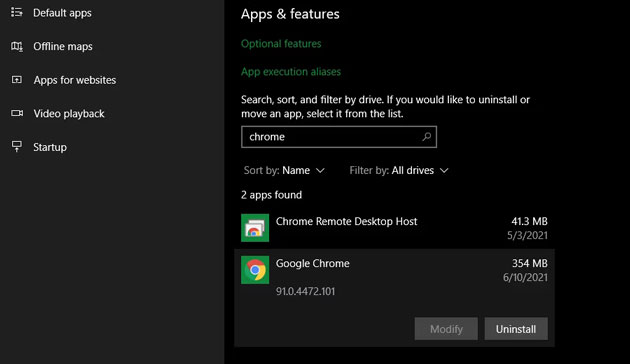
If there are certain apps you don’t want to uninstall because you use them occasionally, you can prevent them from launching at startup. Many apps are configured to start automatically every time you log in, which is unnecessary if you rarely use them.
4. Update Your Apps
Installing app updates promptly is essential for security reasons, but it can also help reduce RAM usage.
Some apps may suffer from memory leaks, where they fail to release RAM resources after use. Over time, such apps will progressively consume more RAM, depriving other applications of resources. By installing the latest updates, you may benefit from bug fixes that address these memory leak issues.
Additionally, newer versions of apps often include optimizations and improvements, resulting in reduced RAM usage overall.
5. Utilize Lightweight Apps and Manage Running Programs
What if you genuinely need to clear RAM but rely on resource-intensive apps for your workflow? There are two approaches you can take.
First, consider using lightweight alternatives to resource-intensive apps whenever possible. If your computer struggles when running Photoshop, try using smaller apps like Paint.NET or GIMP for minor edits. Reserve Photoshop for when you’re fully dedicated to working on a project.
Second, pay closer attention to the programs you have open. Close any software that you’re not actively using. Develop a habit of saving files when you finish working on them and then closing the associated applications. If you come across browser tabs that you intend to read later, bookmark them or utilize a read-it-later service like Pocket, and then close the tabs to free up RAM. Exercising more control over the number of concurrently running programs will help free up RAM.
Ensure that you expand the System Tray section of the taskbar located at the bottom-right of your screen by clicking on the small arrow. Each program with an icon here is running in the background, so right-click on any unnecessary items and choose “Close” or “Exit.” Then follow the previous steps to prevent them from running at startup.
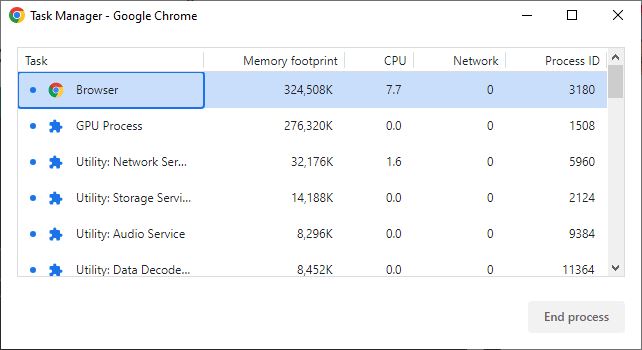
Google Chrome deserves special attention in this regard, as it’s notorious for consuming large amounts of RAM. Consult a guide on how to control Chrome’s memory usage for tips. If you frequently work in your browser, switching to another option such as Edge, which uses less RAM, might be a better choice.
Regardless of the browser you use, review your browser extensions and remove any that are unnecessary. Each extension consumes additional memory, so eliminating unnecessary ones is an easy way to further reduce RAM usage.
6. Scan for Malware
If your RAM consistently runs out, it’s worth checking for malware on your PC. Malicious software can consume your available RAM, significantly impacting performance.
We recommend running a scan with reputable antivirus software such as Malwarebytes. Ideally, it won’t detect any threats, but at least you can eliminate the possibility of malware causing RAM-related issues.
7. Adjust Virtual Memory in Windows
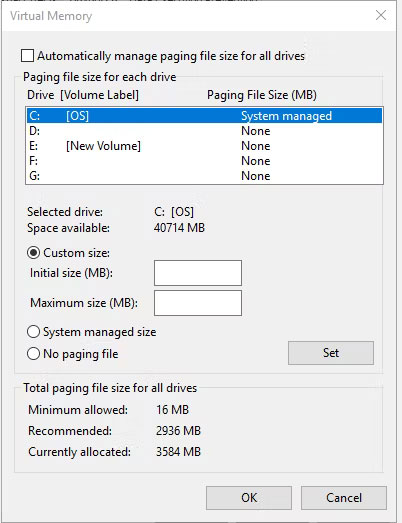
Earlier, we mentioned the page file, which comes into play when your system runs low on RAM. If you encounter error messages indicating low virtual memory, you can increase its size to maintain stable performance.
To do this, navigate to “Settings > System > About.” On this page, click on “Advanced system settings” to open a new window. If you’re using Windows 10 and don’t see this link, expand the Settings window horizontally until it appears. On Windows 11, you can find it in the “Related links” section under “Device specifications.”
In the new window, switch to the “Advanced” tab and click the “Settings” button under Performance. Another window will open; switch to the “Advanced” tab once again and click the “Change” button in the Virtual memory section.
Now you can view the paging file size for your main drive. In most cases, it’s best to leave the “Automatically manage paging file size for all drives” option checked so that Windows handles it. However, if you frequently experience low virtual memory, you may need to uncheck this option and manually set higher values for “Initial size” and “Maximum size.”
8. Try ReadyBoost to Supplement RAM
If your computer has limited RAM and is older, you can explore a lesser-known Windows feature called ReadyBoost. This feature allows you to utilize a flash drive or SD card as supplementary RAM.
However, it’s important to note that the effectiveness of ReadyBoost is limited today. If your computer already has an SSD, ReadyBoost won’t provide any noticeable benefits. This is because an SSD is faster than a flash drive, making the page file on the SSD more efficient than using a USB drive as additional RAM.
Furthermore, modern computers typically come with sufficient RAM by default, so the gains from using ReadyBoost are less significant compared to older, less powerful systems. The “pretend RAM” offered by ReadyBoost doesn’t provide the same performance improvements as physically adding more RAM.
Therefore, ReadyBoost is only recommended for older systems when you need to increase the effective amount of RAM. In most other cases, the only viable solution for acquiring more RAM is to install additional physical memory modules.
9. Install More RAM
If you consistently experience low RAM or require the ability to run multiple programs simultaneously, the most effective solution is to install more RAM in your machine. Although this involves a cost, the performance boost from increased RAM capacity can be substantial if your computer is currently limited in this regard.
If you’re wondering how to acquire more RAM, it’s important to understand that you can only increase RAM capacity by adding physical memory modules to your computer. Claims about “downloading more RAM” are merely jokes; it’s not possible to expand memory in that way.
For desktop computers, adding more RAM is usually a straightforward upgrade. However, due to space limitations, adding RAM to a laptop can be challenging or even impossible. Refer to our guide on upgrading your laptop’s RAM for detailed instructions.
In either case, ensure that you purchase RAM that is compatible with your system. Consult your PC manufacturer’s documentation to determine the type of RAM that works with your machine and whether the upgrade process is straightforward. Online forums can also provide helpful guidance in this regard.
RAM Cleaners: Should You Use Them?
You may have come across RAM cleaning utilities that claim to improve your RAM performance in various ways. However, we recommend avoiding such tools.
Refer to our coverage of CleanMem, one example of such an app, to understand the reasons behind this recommendation. In summary, RAM boosters are mostly placebos that “free up” RAM by taking it from programs that may actually need it.
Memory management is a complex issue in computing. The Windows developers, who are experts in the field, have a better understanding of how to handle it compared to random developers who create RAM cleaning software. It’s important to note that your computer utilizing most of its available RAM is not necessarily a problem; it indicates efficient utilization of the available resources.
RAM Is Just One Piece of the Puzzle
We’ve explored various methods to free up RAM on both Windows 10 and Windows 11. However, it’s crucial to remember that other components of your PC also contribute to overall performance. Upgrading certain hardware components can have a more significant impact on your computer’s performance than focusing solely on RAM.

